Before I could start these gloves, I had to decide which of the 4 designs from the SWRI patterns I would use, or even whether to use one of the Sanquhar designs described elsewhere such as in Rutt’s book. A lot of the most famous Sanquhar designs are based on an 11 x 11 stitch square grid. The SWRI pattern using that square has 99 stitches around the palm, which for my 6.7″ palm would require a gauge of 14-15 sts/inch, which I didn’t want to do. The other patterns have 80 (Shepherd’s Plaid).and 90 (the other 2) stitches, so would work better. Perhaps one day I’ll make a pair for Rys and then I could use one of the grid patterns..
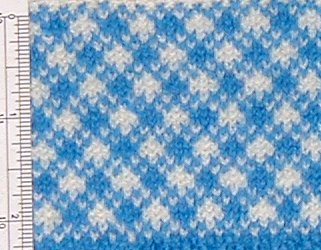
Of the other traditional designs, my favourite is Prince of Wales, so I swatched that one first, using some J&S lace weight send to me by Jenny S (thanks again!) using 2mm dpns (11.5 sts/inch):
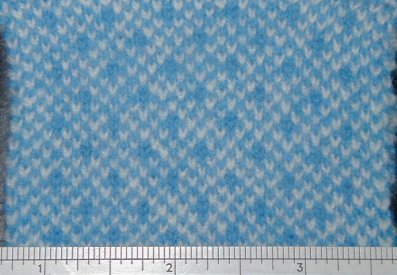
After some thought, I decided that as an overall glove pattern, I preferred the Midge and Fly glove, so I swatched that next, using the same yarn but 1.75 mm needles:
That gave me a gauge of 13 sts/inch, which is what I needed, and I liked the fabric, so I cast on without swatching for the corrugated rib cuff, but fortunately it fits well. I like the blue and natural swatches, but as you can see I’ve chosen to go with the grey and white yarn which I had already ordered.
Earlier this month, I finished a pair of socks for a friend, but I didn’t want to post pictures here until she had received them. She has them now, so here they are (pictured before washing, and not on Ann’s feet):
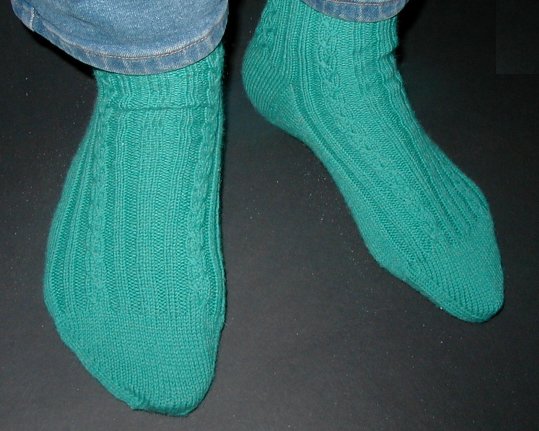
Here is a close-up of the faux plaited cable, actually a slipped stitch ‘cable’ from Barbara Walker’s first Treasury, p108:
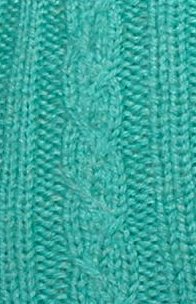
The yarn is Super Sport Strumpf wool/nylon, given to me long ago by a kind Knitlister living in Germany. It has been maturing in my stash waiting for the perfect recipient.
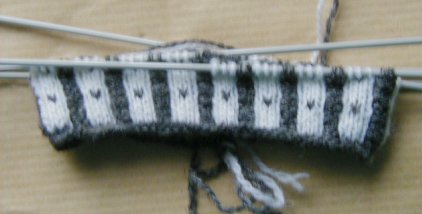
My current small project is Sanquhar gloves, similar to these but with a different traditional stitch pattern. The SWRI has patterns for 4 versions of these gloves. I am swatching J&S laceweight. I have done a swatch on 2 mm needles which is too loose for the gloves to fit my narrow hands, so I started another on 1.75 mm (promising!) and I’ve just changed to 1.5 mm. I’ll post photos later.
My other WIPS are socks for me in Opal and 2 Faroese shawls, both from Heartstrings. Pendants is for a friend, and ALF (All-Over Lace Faroese) will probably be for me unless I decide I haven’t time to knit another shawl for an exchange with a May deadline.
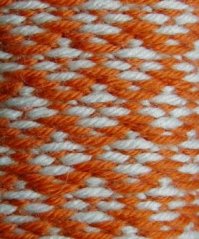
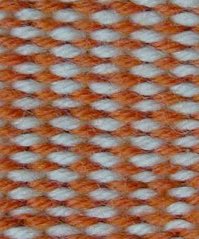
… just not updating the blog as often as I should. One reason was not wanting the intended recipients of my recent projects to see what I was making. The exchange mittens have reached their home, so I can post pictures of those now. .
The recipient requested natural or warm colours, with a preference for orange. Orange is not a colour I would usually use, but I like a challenge. I was going to spin the yarn from BFL/silk, but my dye attempts didn’t work out the way I wanted (though some of the silk turned out really well). Eventually I decided to buy yarn, but there wasn’t much choice of orange yarn locally. I ended up with Jaeger Baby Merino 4-ply, even though I don’t really like using superwash merino.
My first attempt at knitting the mittens was aborted as I found I couldn’t control my gauge with the longer floats (5 stitches) in this yarn, though I’ve done so successfully in the past. The final pattern was derived by combining elements from various patterns in Folk Mittens and the Mitten Book.

I like the texture the stranding produces on the inside, and all those little air pockets trapping heat.
I received lovely thrummed mittens in return. I don’t have pictures yet as Mary intentionally left them slightly large so I could full them to an exact fit. I’ll post pictures eventually, but for now, here is a link to the picture on Mary’s blog (January 26th).
My Secret Santa from the Fiberlings chat group sent me a beginners book on the ancient craft of nalbinding, so I’ve been experimenting this evening. This is my first attempt. There are a few mistakes (or possibly more than a few) and the tension is erratic, but it’s a start.

The book is Nalbinding Made Easy. Thanks, Eboni, and thanks also to Kiara, who helped advise on the choice of book.
We had a Christmas raffle at the guild today. My ticket won a prize, but I was so busy warping the warp-weighted loom to demonstrate that I didn’t even notice, so my DH went across to choose my prize. Knowing him, I’d expect him to come back with the box of chocolates I knew was there. Instead, he came back with this:
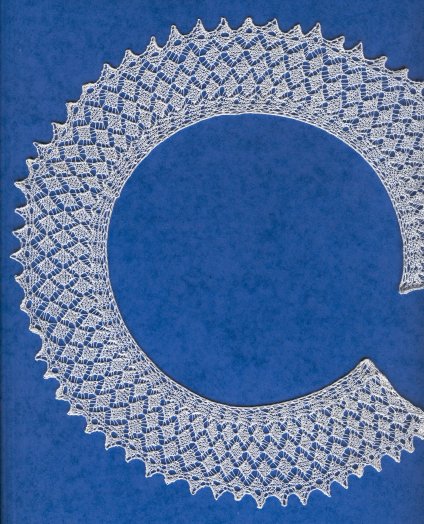
Here is a closer look:
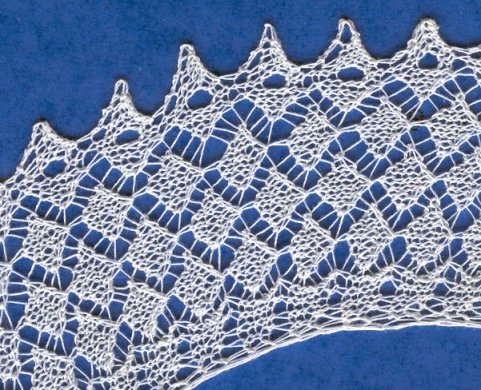
The collar is knitted in stockinette-based lace using very fine thread. It is 2″ wide from the points to the inner adge, and the whole thing is about 9.5″ across. It was knitted by a friend of the late sister of a guild member (and friend), and it is beautifully made.
So isn’t that a great raffle prize? Bettter than chocolates or toiletries. :-)
It’s been a while, but I can finally post pics of some of the things I’ve been doing this autumn. though others haven’t reached their recipients yet. I wove some bookmarks for an exchange, as I had a warp I needed to use up:
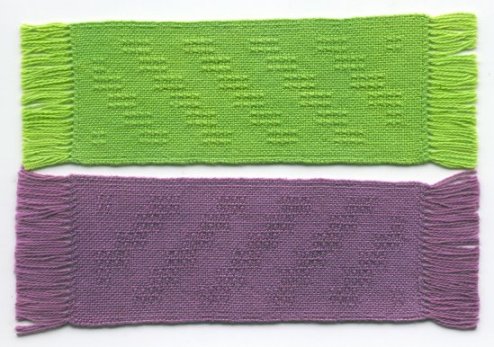
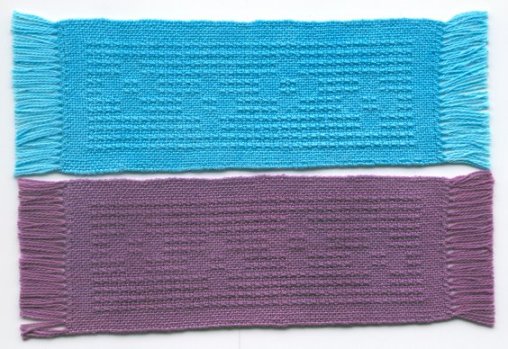
The warp and weft were 12/2 white mercerised cotton. I used fibre reactive dyes to dye the finished bookmarks. The dyeing wasn’t completely successful as too much of the dye washed out, changing the colours, so after those, I wove a few for Christmas presents using lilac 12/2 weft.
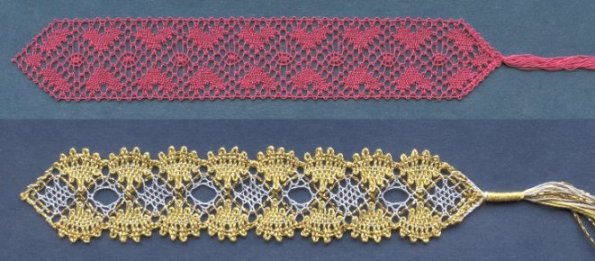
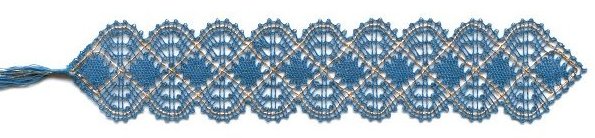
I went back to bobbin lace after a long break to make the rest of my exchange bookmarks, and I have really enjoyed that. I have done 3 so far, with one more to do, but I’ll make a couple more for presents.
… about keeping my blog up to date, partly because both my current fibre projects are ones I can’t talk about too much here.
One is mittens for an exchange, and I don’t want to risk spoiling the surprise for my exchange partner. I was preparing Shetland fleece but it has been slow going as the fleece has a break just above the base so I’ve been combing each lock to get rid of that part before I can drum card it all.
I’ve finally decided I can’t get that done in time, so yesterday I mordanted a lot of merino top and both bombyx and tussah silk. Today, half of it is in the dye pot cool dyeing. More will be hot dyed tomorrow, and then I’ll do an exhaust bath on Monday. If I get a good enough colour contrast, I will probably do stranded colour work, but if I don’t think the colours will work, I’ll card it all together to spin a heathered yarn and knit a textured pattern.
My other project is weaving samples for a medical research company. I can’t say much more than that, but the first samples are at 120 epi. They are small samples, thank goodness!!!
I probably won’t post more details or pictures of the mitten project till after they reach my partner, and unfortunately I won’t be able to post pictures of the woven samples at all. I do have some workshops coming up though, so I should be able t report on those, at least.
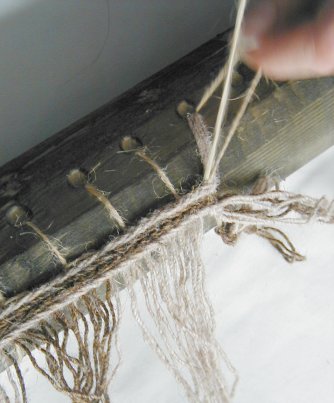
Tonight we got the band attached to the warp beam. Click on photos for close-ups, as usual. First, we had to work out where to position the band. Then we used the ends of the TW warp to tie it to the beam – under tension, so longer than 15″ again.
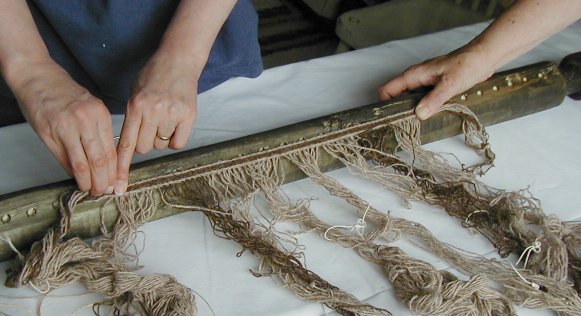
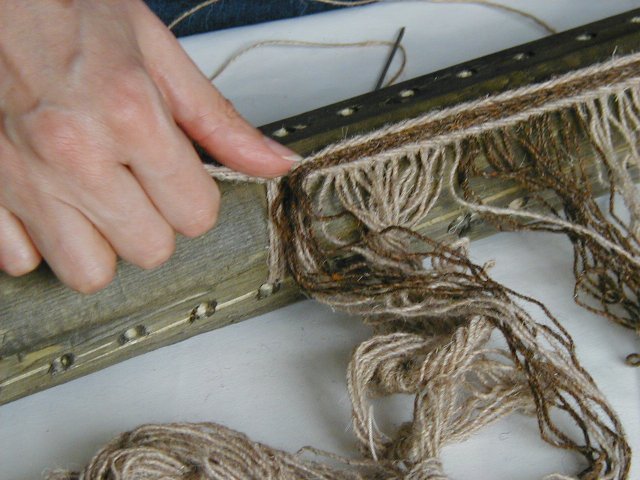
Next, I sewed it on, with Elizabeth’s help (Rys was also helping by being cameraman). We found it easier to sew it on without worrying too much about the tension, adjusting that at the end. In the next photo, as I am tying off the end of the sewing cord, it has already been tensioned and the stitches lie straight.

We discussed sewing along the band again but this time going all the way around the beam with each stitch, just for added security. Some of the attached warps shown in the Hoffmann book have this, others don’t. However it was getting late and we all wanted to eat, so we decided to leave it for this evening. Elizabeth will decide tomorrow whether to do the extra sewing. If she does want to do it, it should be easier to do alone than the first row of sewing would have been, as the band is already held in position.
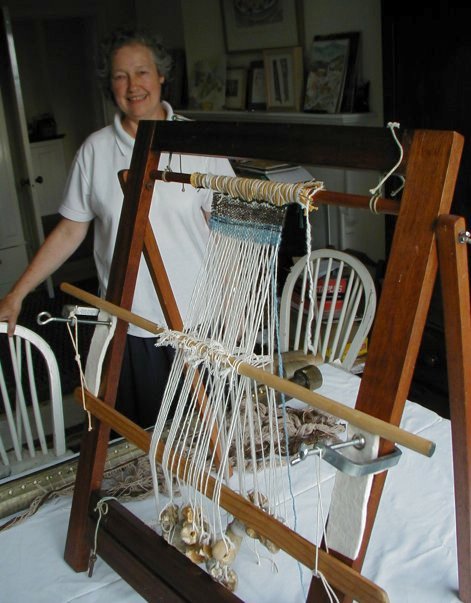
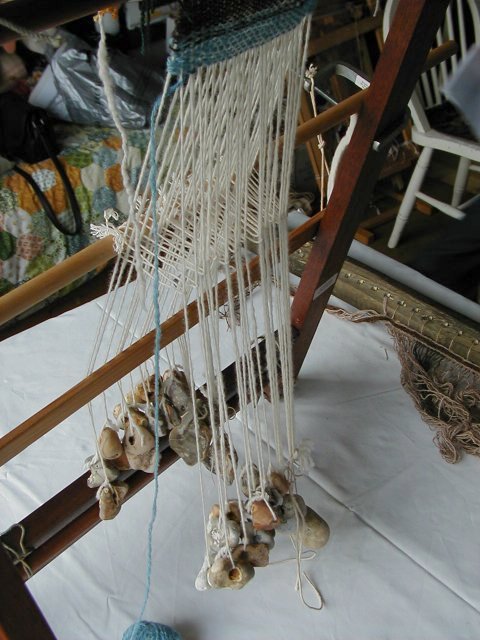
While we were there, we took photos of the mockup WW loom which Elizabeth made at the start of this project to help us all understand the principle of WW looms. Small versions of those pictures don’t work, so click the description for the front view, back view and a close-up of the lovely stone weights. We would have like to use stone weights for the real loom, but we couldn’t get enough suitable ones, so we will be using bags of lead instead.
Well, that got your attention, didn’t it?
Actually, I don’t think we will be having an orgy on Saturday at the Open Day at Silchester, where the Roman town of Calleva Atrebatum is being excavated, but I hope it will be fun anyway. As I mentioned last week, the Berkshire Guild will be demonstrating Roman weaving and spinning, or at least doing our best to do so. We will be weaving on a warp-weighted (WW) loom, tabletweaving (TW), and spinning using spindles based on whorls found on the site.
I hope to get a chance to spin there, but my main involvement is with the tablet weaving. I’ll be demonstrating TW on the day (using ‘authentic’ wooden cards if I can finish them in time, plastic ones if not), but I have also been weaving the starting band for the WW loom warp. [If you aren't interested in the more technical details, skip to the pictures near the end.]
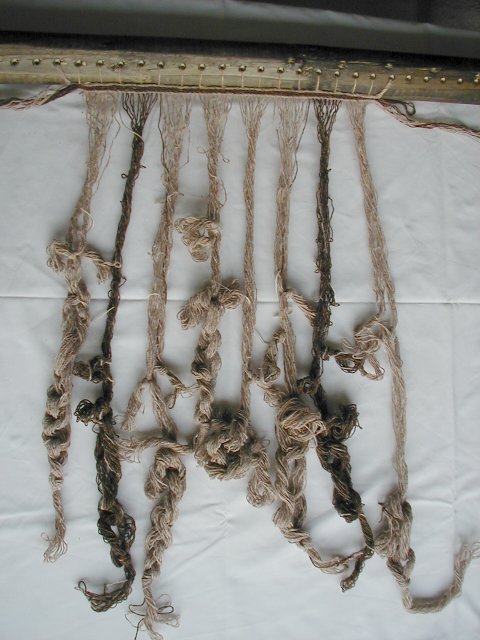
Later, WW loom warps were made over a cord which was attached to the top beam, but in the Iron Age and Roman times they were made by weaving a narrow band with a long fringe on one side which formed the WW warp. This serves to space the warp threads, which the later simple starting cords do not.
When I had read about these bands before, I had assumed that they would be woven with an ordinary weft and that the WW warp would be a supplementarty weft, but reading the ‘bible’ on WW looms, by Martha Hoffman, I found that the WW warp is the only weft used. The band warp grips the weft (= WW warp) well enough to stay in place while the warp is mounted on the loom (at least for wool, I don’t know how well it would work with silk).
Some of these bands are plain weave, but the majority seem to have a twisted structure which suggestes that they were made by tabletweaving. Some could possibly have been made by manual warp twining, but there are some wider borders for which this would have been very unlikely. A tabletwoven starting border with tablets still attached has been found in Spain in a 5th century BC grave, so we know the method was defintely in use well before Romano-British times.
I’ve been collaborating with Elizabeth, a very skilled tapestry weaver who has taken primary responsibility for the weaving, Janet who is producing the weights, and her friend Ken who has built the loom for us. Unfortunately, I don’t have photos of the loom yet, but I will be taking lots of pictures at the event and hope to have them here by Sunday (if I’m not exhausted), and there will be pictures on the guild site too.
My task was to produce the warp for the loom. We didn’t want to use a fine warp as that would make it harder for visitors to see what we are doing, so we decided on a well-twisted 2-ply wool yarn that will weave balanced plain weave at 8 ends (threads) per inch. Because of space restrictions our loom will only weave cloth about 24″ wide, but for this first attempt, our warp will only be 15-16″ wide.
The WW warp ‘fringe’ needs to be about 6 foot long and as consistent as possible. It is created by pulling loops of thread through the TW band, so I needed some way of measuring the length of those loops without having to keep walking across the room. The pictures below give an idea of how I set it up – as usual, click for a larger version.
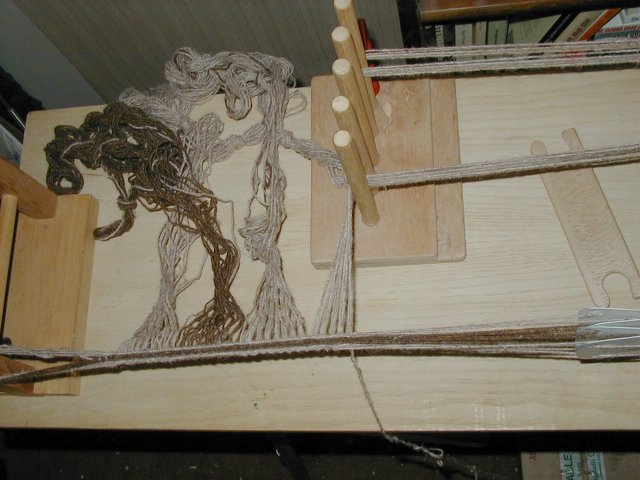
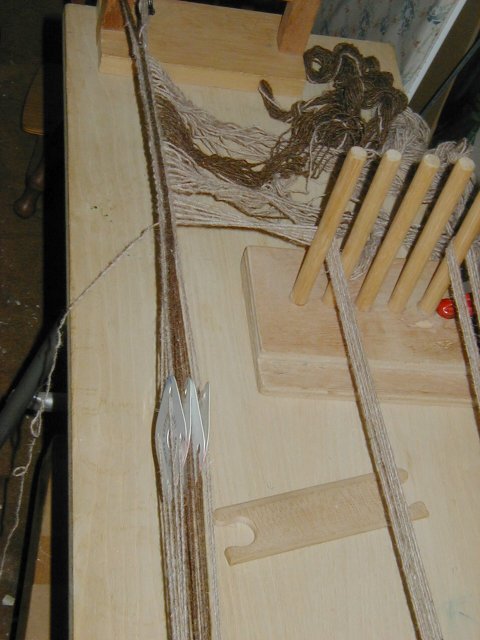
Here is a better picture of the band and ‘fringe’ in progress.
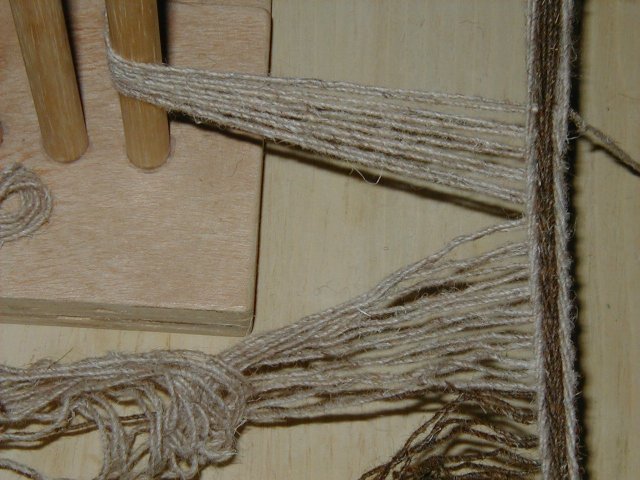
I found it much easier to weave the band than I had expected. The biggest problem is that using the same yarn for the band and the WW warp and beating in the usual way for tabletweaving gives a warp spacing that is too close for plain weave. We had already decided that we didn’t want to weave twill as that would require multiple heddle rods (if you have no idea what a heddle rod is, later posts here or on the guild site should have a proper explanantion of the construction of the loom). I found just pressing the weft into position with my fingers once I had turned to the next shed was enough to give the right warp spacing. If we decide to weave twill for the second Open Day (yeah we might be that crazy!), I’ll probably need to beat that band in the usual way.
The next stage of warping will be to attach the band to the top beam. Elizabeth and I are meeting to do that tomorrow evening, so I may have a report (and pictures) on Friday.
backup, backup, backup …
… and the story of this moral is that my c: drive got corrupted last week and I lost all the data on it, and no, of course I hadn’t been good enough about keeping backups. I think I’m saddest about losing pictures of projects which I gave away or sent to exchanges over the past couple of years. I was better about things like my mail archive. Fortunately, some of the project pictures are here or on my web site, so I can retrieve those.
Anyway, if you have been reading this looking for fibre content, sorry, there isn’t any, except that our guild is involved in 2 Open Days at Silchester, a local Iron Age/Roman archaeological site, demonstrating Roman textile production. We are currently deep in the research stage. This evening, I’m going to inspect the progress in building our warp-weighted loom. I’ll write more about it over the next couple of weeks, or give an URL to the guild page on it when we get that done.
Meanwhile, here is another site about Calleva Atrebatum , as Roman Silchester was known.
-
Failed to fetch badge info from Flickr.\n
-

-

-
