My last entry showed a replaced toe and a patched heel. On the other pair of Fortissima socks, there were larger thin areas on the heels so instead of duplicate stitching to strengthen them I decided to cut the affected areas right out and replace them. As there was interest in the earlier post, I thought I’d show this process here. It looks complicated, but as long as you are comfortable grafting two rows together, it is easier than it looks.
[Note: these socks were knitted toe-up, so the gusset stitches were on needles and as I knit back and forth across the flap, I ‘ate up’ one gusset stitch at each turn, using ssk and p2tog. This makes it easy to reknit the heel flap. For top-down socks with the gusset stitches picked up from the side of the heel flap, it isn’t quite as simple. If I were repairing that type of heel, I would probably cut the whole heel out, including the shaping at the bottom, repair as shown here but starting at the top of the flap, continue with the original heel shaping and graft across the bottom of the heel.]
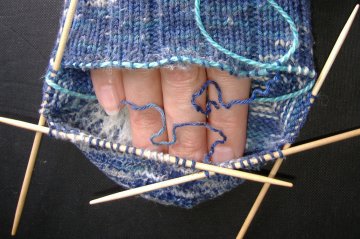
So, the first (and possibly most difficult) step is to snip the yarn a few rows away from one edge of the area to be repaired and start unpicking the yarn. It may be quite felted, so be careful. When you get to the edge, store the freed gusset stitch on a dpn or waste yarn. Continue doing this till you have only one row to go, then carefully tink the stitches one by one, putting them onto another dpn or piece of waste yarn. As you cut off the reclaimed yarn, remember to leave a long enough end to sew in later. The repair is slightly easier if you start and end at an edge, but I find that makes it bulkier where the ends are sewn in so I prefer to stop the unpicking mid-row. Repeat the process in the opposite direction.
 Â
Â
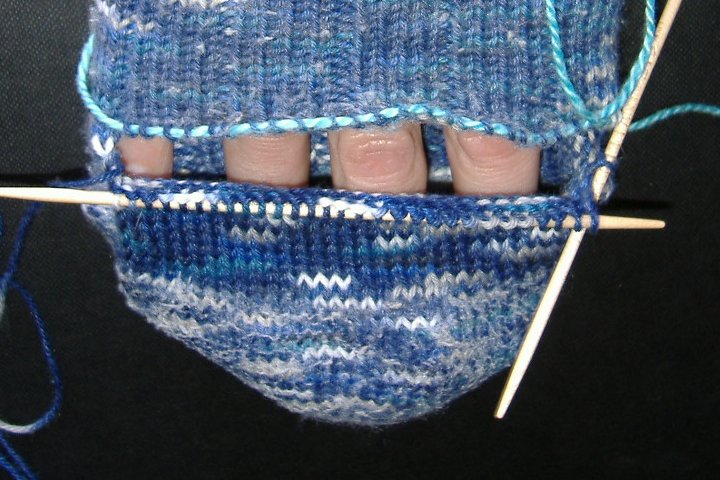
You now have a sock with a big hole, but no loose stitches. I have left the top edge of the hole on waste yarn as I find it gets in the way less that way. The next task is to knit the missing part of the flap, ending one row early ready for grafting.
 Â
Â
Note the gusset stitch still on a needle (later replaced by waste yarn as the needle fell out) at the right of the picture. The last stitch on the left side has already been used up. The new stitch that did that is the slipped edge stitch, which needs to be linked to the row above. Pull the free end out of the stitch below, and use it to graft to the slipped stitch on the row above, then back into its original stitch. Now you can graft the flap to the row above. If you are starting and stopping at an edge, that’s all you need to do – you can just sew in the ends. If you are starting and stopping in the middle of a row, you will get to a point where thre are two missing rows, not just one, so you have to stop grafting.
 Â
Â
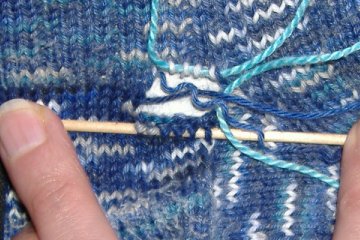
After completing the last full stitch on the bottom row, use the yarn end to continue knitting (or in my case purling) across the row, turn as you did at the other side and then graft back to fill the remaining gap. Sew in the ends and you now have a fully repaired heel.
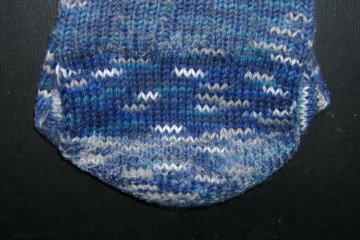
Now I have a confession to make. When I tried to do the final piece of grafting, I found I was one stitch short at the top. After some close inspection, I realised I had aligned the stitches wrongly at the start of the grafted row. Now any sensible knitter would say “It’s only a heel flap, no-one will see it, so just fudge it to make it work.” I repeat that … NO ONE WILL SEE IT!!!! But I couldn’t do that. I did try to convince myself, really I did, but I ended up grafting across the whole of that second row, unpicking the original yarn ahead of me, till I reached the other side and corrected the mistake, then turned the corner and did a few more stitches so I could join in mid-row again. Yes, I’m crazy!!! But at least I can look at my repaired heel and feel real satisfaction.     Â
-
Failed to fetch badge info from Flickr.\n
-

-

-
