For our silver wedding anniversary in 2004, we decided to treat ourselves to a takadai. We both do kumihimo, and we have been fascinated by the takadai and the braiding possibilities it offers for a long time. For information about using a takadai, see the Braidweaver site.
We got ours from Braidershand. We chose to economise by having it sent over by surface mail, so it didn't arrive till the end of January, and because we didnt't have space to leave it assembled then, I didn't get to make my first takadai braid till April 2005. This is Braid 1 in Rodrick Owen's "Making Kumihimo":
I did not get a chance to make any more braids until we were lucky enough to take a two-day takadai workshop with Jennie Parry in June 2005. We warped up a new braid each day, removing both warps part-finished, but I later re-installed both warps and finished them. Both braids were made with multiple strands of silk per bobbin.
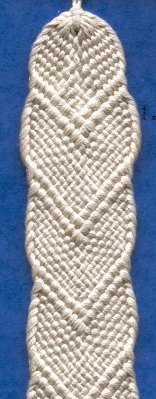
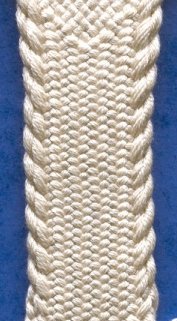
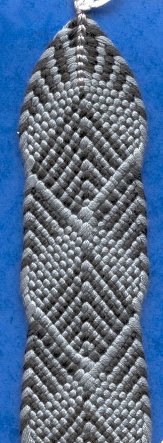
The first day's warp was a 33-bobbin plain colour, good for exploring texture without being distracted by colour changes. We had the choice of starting with a tassel or removing the tassel binding for a blunt start, which is what I chose to do. The first and third sections were both plain weave interrupted by rep weave. In the first section, this was done symmetrically, and in the third section they were done on alternate sides. The rep sections are narrower, so these patterns create interesting edge shaping.

In the next two patterns, the back differs from the front, so I'm showing both. I've had to scan at a higher resolution to show the differences, so they look wider than they are when compared with the earlier and later braids. The first one is known as taka-aze-gumi. It is thicker and narrower than the plain weave braids.
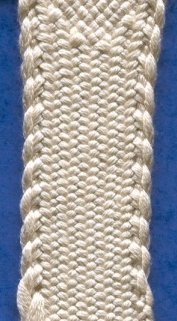
This pattern is mugiho-gumi, known in English as wheat ear, which I think just refers to the edging, as the centre is standard 2-2 twill, or kourai-gumi.
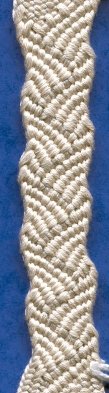
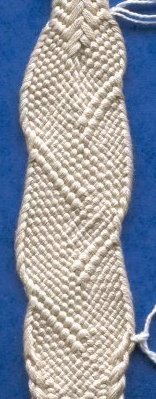
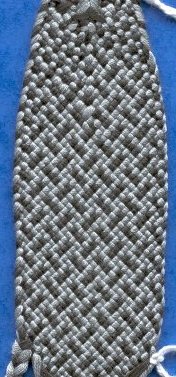
When I had finished the patterns Jennie had given us as exercises, I still had a lot of warp left. Jennie had given Debbie seikaiha-gumi (ocean wave) as an extra exercise to do on the first evening as she was the only one who had access to her takadai that night. She used 37 bobbins loaded with a very shiny silk. I adapted it to 33 bobbins (see left), but the silk I was using was not as shiny as Debbie's so it does not show off the pattern as well as hers does.
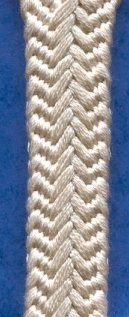
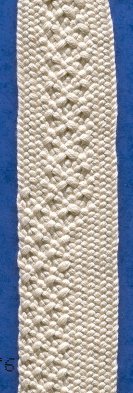
To finish the warp, I picked an interesting textured pattern from Rodrick Owen's "Making Kumihimo". It is his Braid no 10, but I think from looking at Makiko Tada's "Taka-dai braids 1" that the textured part is called kohrai-gumi. Rodrick gives the version with the textured panel down the centre, but leaves the version with the texture down one side as an exercise. I think I may soon try a braid with the textured area moving back and forth across it in a regular or random sequence.
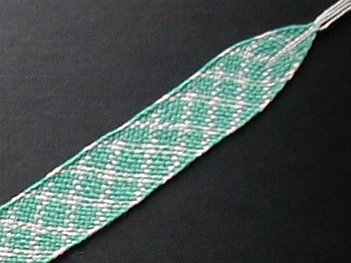
On to the second day. This time, Jennie gave us two-colour warps with 36 bobbins, 12 dark and 24 light. Unfortunately the two colours I chose don't show up well here. The first section is another plain weave and rep pattern, but the colours make it look different. Also, this one is from a pointed start. You can see the grey starting cords running down a short distance from the point. Those stay in the finished braid.
The pattern on the right is just plain weave, but with a different starting arrangement of bobbin colours. I got the left hand movement wrong at the start of this section so the pattern doesn't get established at once. I did this pattern using the leftover Day 2 warp, but it is convenient to put it here as that lets the other sections group together better.


On the left is kanoko-gumi. The light threads do rep, the dark threads bind them (not a good description, but the best I can do).
On the right is uni-gumi, known as Farmer's Furrow. This is one of the structures that drew me to the takadai in the first place. On the right side, a ridge forms down the centre. I've shown the back too. Rodrick Owen suggests folding this one in half to use as binding, with the ridge forming the edge.
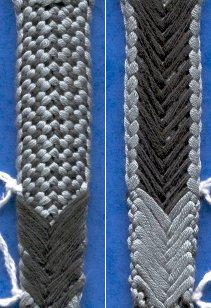

And finally (yes, there is an end to this!), this set of structures are all different on their reverse sides, so again I have shown both sides. On the left, the first one is sasanami-yamato-gumi. The bobbins travel in groups of three - two light ones go through the shed and one dark one goes over the top, forming the float. Below it is ryoumen-taka-yamato-gumi, which is similar except that only one thread goes through the shed, the others going above and below the warp to form floats on both sides. This one could be done with 3 colours, the third colour being used for the thread passing though the shed. Of course, both the structures could be done with a whole range of colours, as grading or striping the floating threads looks very good. They would work better if the floating threads were a little thicker than the rest to get better coverage.
The last structure is a slightly different form of sasanami-yamato-gumi using an odd number of groups of three bobbins. In this case, I removed two light bobbins and a dark one to leave thirty three. Note how different the centre of the braid is. I think it is so much neater that the first form I did, and I even prefer the back of this one too, with its little zigzag going down the centre (which unfortunately doesn't show up well in the picture).
So, that was what I produced over one weekend and the following week, thanks to Jennie Parry. I learned so much, and I have so many ideas I want to develop. Most of all, it confirmed that I really enjoy takadai braiding. I like the hands-on contact with the warp, the detailed control over the patterning, the ease with which you can make minor variations. It pushes many of the same buttons that tablet weaving, ply split braiding and pick-up weaving do for me. Watch this space for further developments, as long as I don't have to pack the takadai away again too soon.

For information about braids, bands and narrow wares of all types, contact the Braid Society .
Back to Jenny's Kumihimo Page
Back to Jenny's Home Page
This page is http://jennyk.co.uk/braidsnbands/kumihimo/takadai.html
© 2000-2006 --- last updated 17th November 2006